Wednesday, February 29, 2012

Project 52 Weeks: Page 8 & 9

"It's your life--but only if you make it so."
-Eleanor Roosevelt

We've been in a good rhythm for the last couple of weeks, and that goodness is reflected in the SMASHbook pages from the last two weeks.

Week 8. This is the good life!!

Supplies used: Paper from Basic Grey's Urban Prairie collection, vintage dictionary pages, graph paper, white thread, circle punches, date stamp.


Journaling reads:
  • Feb 14. We celebrated low-key for V-Day, in hopes that we'd have a bigger celebration later in the week.
  • Feb 16. We got word that our house in Buford finally closed. We were so relieved to end this chapter of our lives. We celebrated at Applebee's.
  • Feb 17. Callie and I worked all week (remotely!) to write a proposal for a curriculum writer position at A.S.P. We're super stoked, and hope that they choose us for the project!
  • Feb 18. I joined Rob as his cheerleader for the 1st bike race of the season. Turns out he needed SAG support as well. Luckily only the bike was hurt!
  • Feb 18. We drove up to Charlotte for the afternoon--we browsed bike shops and scouted out IKEA.


Week 9. Currently [Feb 25, 2012].

Supplies used: Random orange/yellow scraps (including a shiny, metallic sheet that I've saved for years), graph paper, date stamp. Fonts: Pacifico and Andale Mono.


Journaling reads: [Inspired by Life.Love.Paper's "Currents" series.]
  • time: 12:35 pm
  • location: sitting in the car at the Donaldson Center parking lot, waiting on Rob to finish his bike route
  • drinking: a 32 oz Coke from Spinx... it took little convincing
  • doing: cleaning out Rob's car while I wait
  • loathing: the blustery wind that keeps blowing the trash out of the car
  • hoping: that Rob's racing confidence comes back
  • anticipating: our date night tonight... we're going to see a special screening of a cycling documentary at the BMW Zentrum
  • wondering: what we'll do with the rest of our afternoon
  • creating: projects in my head for our new house
  • loving: REI because they were able to exchange my shoes
  • thinking: what a wonderful day this is

Tuesday, February 28, 2012

Good thoughts...

“Hold fast to your dreams, for without them life is a broken winged bird that cannot fly.”
-Langston Hughes

As you probably know, I've always been a quote collector. But, recently I've been collecting quotes for a special project I'm working on. Only quotes that personally resonate with me right now. That inspire me today. That mean something to me in this moment.

It was impossible not to share this one...

Quote seen attributed to Ellen Johnson Sirleaf. Art by Jana Brunken.


Being unemployed gives me lots of time (and reasons!) to dream. Sometimes it's hard to embrace the scary dreams, but I've got to hope that some of the big dreams will come true one day.

Monday, February 27, 2012

Weekend happenings...

"Every day you are alive is a special occasion.  Every minute, every breath, is a gift from God."
-Mary Manin Morrissey

It was a good weekend. It had a rough patch or two, but as the saying goes, "that which doesn't kill us makes us stronger" and more grateful for the wonderful life I have.

Friday night we couldn't decide where to eat, and ended up at Long John Silver's... gross! But we sure did laugh a lot as we ate our meal.


Saturday morning we went down to Greenville for Rob to get some miles and some cycling practice. While he went around and around the 7-mile loop battling the wind, I went to REI to exchange the shoes I won back in November. I was tickled to get a new pair of running shoes and a new skirt!


Saturday evening we went on a real date to the BMW Zentrum for a special screening of the cycling documentary, Chasing Legends. It was awesome and totally provided a unique perspective of the Tour de France... all of the training, all of the behind-the-scenes people, all of the personalities, all of the suffering. Totally recommend it!!


Sunday morning was Race Day, and I was proud to be the supportive bike wife. (It was only the second time he's asked me to be there!) We got there early enough for Rob to get some track time to warm up. He was feeling good, and in the first few laps, he moved from the back of the pack up to the group that was going to break away from the peloton. (Look at me using cycling lingo!)


But, again this weekend, it just wasn't meant to be. Someone right in front of him went down and he couldn't avoid them, so he went over, too. From a distance, I was hoping that he would hop back up and take the free lap, but luckily he checked his helmet before going again, and unluckily it was cracked (the boy hit the pavement hard!!).


With such a downer morning, we returned home just to relax, watch NCAA basketball, and cuddle on the couch. We did venture out for a quick lunch and a spur-of-the-moment hair cut. Super spontaneous for me... I was deciding what I wanted while I was sitting in the chair. It turned out pretty cute though... even Rob was impressed!!

Friday, February 24, 2012

A neighborhood of cookies...

“God gave you a gift of 86,400 seconds today. Have you used one to say “thank you?"
-William A. Ward

One of the few blessings of the home sale process (besides finally closing that chapter of our lives!) was meeting and getting to know our real estate agent. His name is Robert Delay, if anyone in the Atlanta area is in need! To thank him for his awesome work (he basically sold our house three times before it was all over!), I put a box of sweet treats in the mail to him today.


I had an idea for sugar cookies in my head, and I spent the last couple of days making it happen... after watching several videos (here's a good one from JoyofBaking.com!) about cookie decorating and making a trip to Hobby Lobby for icing tips.

Of course, a good blogger stops along the way to snap some Instagram shots!

I carefully stacked the cookies in an empty (and decorated!) Pringles can, and then stuffed a bunch of bubble wrap and tissue paper so the tube wouldn't wiggle. Topped it off with a personalized card, and sent it off on its journey. Hopefully Bob enjoys the small token of our appreciation!


If you, too, want to show some gratitude to someone in your life, feel free to use this thank you printable. You can cut out the graphic itself and adhere to kraft paper card like I did, or just cut out on the outer lines and fold in half.

To download the printable, right-click the image below, and click "Save Image As."

Tuesday, February 14, 2012

Canvas Photo Tutorial

"Love is when you can be your true self with someone, and you only want to be your true self because of them."
-Terri Guillemets


Want to see what my husband's getting for Valentine's Day?? You have to promise to keep it quiet for a couple of more hours until he gets home from work.... pinky swear??

My tradition is to make my Valentine's Day gifts for Rob. And, sometimes that's tricky, given that we're not a super-duper, lovey-dovey, smooshy-mushy couple. Here are a couple of ideas that I've used previously: 2011, 2010, 2009, 2008.

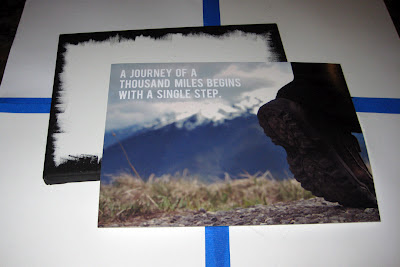
This year, I spiced up a favorite photo (from our 2010 Washington trip) with a favorite sentiment and then took advantage of a project I had been wanting to try: canvas photo art. There are lots of tutorials out there, but I thought I would show you what worked for me. Despite my initial apprehension, it turned out great. Just need a house with walls to hang it on!


Supplies needed: photo printed to size (I used a 12x12 matte photo from Persnickety Prints), canvas, acrylic paint, Mod Podge, foam brushes.


Step One: Paint the edges of the canvas with dark acrylic paint. Make sure to blend the color over to the front and back edges of the canvas.


Step Two: Trim your photo to size... be careful because canvases are not always exactly the dimensions they say the are. I trimmed enough so that the image was just the slightest bit (I mean, less than a millimeter!) smaller than the canvas. Just enough so that it didn't overlap!


Step Three: Paint an even layer of ModPodge on the back of photo. You want to completely cover then page. Turn over and adhere to the canvas. Lightly rub a clean cloth (or your sleeve!) over the surface to remove any air bubbles.


Step Four: Even after my coat of ModPodge, I found that the edges didn't stick very well, so I peeled up the edges to reinforce the corners. Let sit for 5 minutes.


Step Five:  Carefully paint a thin, even layer of ModPodge over the top of the photo. Make sure to go in the same direction and to avoid globs of glue or little crumbs of dried glue. This is the part that had me scared... it goes on milky white, but I promise it dries almost clear.


Step Six:  I wasn't totally happy with my coverage the first time around, so a couple of days later, I added another coat of ModPodge on top. After this dried, all of my "problem areas" were fixed, so I'm really glad I took that chance with the second coat.


And, a Valentine's Day gift from me to you... the boot photo for your own use. Maybe you use it as your desktop background, print it for a frame, or maybe even make a canvas of your own.

To download the photo, right-click the image below, and click "Save Image As."

Sunday, February 12, 2012

Project 52 Weeks: Page 6 & 7

“The details are not the details. They make the design.”
-Charles Eames

Catching up on a couple of Project 52 Weeks pages...


Page 6 highlights the work I did on my exciting blog redesign, and mirrors my post here.

Journaling reads: A new spin on things. Given that the last time I changed up the design on my blog was almost three years ago, I decided it was time to shake things up again. Blog design and html coding were an effective distraction from a crazy week of real estate upheavals, unknowns, and contract extensions. After several full days of planning, creating, and coding, I'm tickled with the results.

Supplies used: Orange paper, Summer Sky textured cardstock from The Paper Company, Crop-A-Dile, Like This SMASHtape, Sophie-White from American Craft's Remarks collection, tiny brads, date stamp, "Let's Ride" glow-in-the-dark alphabet stickers by Noteworthy, chipboard stickers from BigLots.


Page 7 features my Instagram photos from the "10on10 Challenge."

Journaling reads: disinfecting after a week of being sick * washing all of our linens * one chore leads to another * a bit of freelance work * the Netflix move came yesterday... must finish book * an afternoon snack * daily walk to the mailbox * a no make-up kind of day * treated myself to TexMex * time to watch (read!) the movie with the boys *

Supplies used: strip of photo negatives, a Rook playing card, chipboard sticker from BigLots, barcode from a button card, several small buttons, date stamp.

Thursday, February 09, 2012

The Story of Us minibook...

"I don’t wish to be everything to everyone, but I would like to be something to someone."
-Javan


I've been waiting all week to share the "little love note" that I created to hide inside the Love Mailbox and Fabric Valentine's Envelope.

I wanted to tell the story of Rob's and I relationship through Instagram-like photos and doodles, and I was totally inspired by the Matchbook Valentine at My Sister's Suitcase and the adorable Hello Blank Mini Book by superflymollie.


Materials needed: kraft paper, graph paper, square photos, adhesive squares, acrylic paint, paintbrush, good black pen, thread, twine

Step One: Cut three strips of graph paper (3.5" x 6") and one strip of kraft paper (3.625" x 6.625"). Fold the graph paper strips in half. Fold over 0.5" of the kraft paper, and then fold the rest in half.


Step Two: Find 11-12 photos. If they're not Instagram originals, use Photoshop actions by dbox to get that vintage look. Crop to 2" squares, and print on photo paper.

Step Three: Use a dry brush method (brush the excess paint off on the palette before painting on paper) to paint a light area of color on the bottom of each "page." Make sure to get both sides of the fold as well as both the front and back of the strip. Let dry.


Step Four: Use a medium thickness, dark pen to write/draw captions on each page.


Step Five: Stack up the papers, making sure the folds are lined up. Use a wide stitch to sew a seam down the fold. I used the sewing machine, but you could hand-sew it as well.


Step Six: Use adhesive squares to adhere the photos to each page.


Step Seven: Wrap twine around and around the book to hold it closed.


What are the highlights of your love story?

Wednesday, February 08, 2012

Fabric Valentine's Envelope...

"The best and most beautiful things in the world cannot be seen or even touched. They must be felt with the heart."
-Helen Keller

It's always such a surprise (and a moment of serendipitous joy!) to find a personalized note in the mailbox. Do you need some pretty mail for your Love Mailbox??

I had been planning this fabric envelope project in my head for several months, but couldn't decide on a theme-- should it hold letters to Santa, notes of gratitude, or photos of special memories?? In tomorrow's project, we will make a special Valentine's-themed love note to fit inside!


Materials needed: khaki linen fabric, patterned fabric, white fabric, lightweight interfacing, Steam-A-Seam, thread, buttons, letter stamps, stamp pad, sticky-back velcro, bone folder, scissors.

Step 1: Cut out two pieces of khaki linen fabric, using the pattern below. Cut out a piece of interfacing just smaller than the pattern. Cut out some scraps of white and patterned fabric to use as the "stamp" and "label."

Step 2: Adhere the interfacing to one of the pieces of linen fabric, according to the manufacturer's instructions.

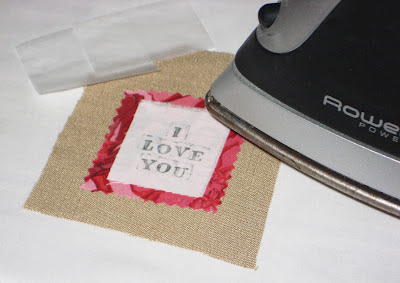
Step 3: Use stamps, zig-zag stitches, and buttons to embellish the "stamp," "label," and even the closure button. This part is very similar to the Valentine's Fabric Tags tutorial from Monday.


Step 4: With right sides together, sew around the sides of the linen envelope, leaving one side open. Turn right-side out, and use a bone folder to push the seams out.

Step 5: Top-stitch around the whole flat linen envelope, closing the open end.

Step 6: Fold the bottom edge up to the line where the flap begins. Top-stitch the sides again. Or you can use a blind-stitch if you don't want the extra seam to show!


Step 7: Add a square of sticky back velcro to the flap to keep the envelope closed.


To download the envelope pattern, right-click the image below, and click "Save Image As."

Tuesday, February 07, 2012

Love mailbox...

"To love abundantly is to live abundantly, and to love forever is to live forever."
-Henry Drummond

Alternative title for this post: "I love the Dollar Spot at Target!"

My favorite part about Valentine's Day in grade school was decorating a "mailbox" or "mailbag" to collect all of the cards and goodies from my classmates. So, when I walked into Target last week and spotted these adorable metal mailboxes on the shelves at the Dollar Spot, I knew one would jump into shopping cart. Well, to be honest, I really wanted to buy 3 or 4, but with no kiddos at our house yet, I couldn't justify it. (And, even at $1 apiece... we're on a pretty strict budget these days!) But, I had great plans for the one I did bring home.


Materials needed: metal mailbox, wrapping paper (my "LOVE" paper is also from the Dollar Spot), ric-rac, matching scrapbook paper, glue dots and/or adhesive squares, ruler, pencil, scissors


Step 1: Trim a sheet of wrapping paper to match the width of the mailbox. Measure and cut a slit/hole in the side of the paper to fit around the mailbox flag.

Step 2: Trace the edges of the mailbox and cut out two of those shapes. Cut out small squares that fit the top of the mailbox flag as well.

Step 3: Use glue dots and adhesive squares to adhere the paper to metal mailbox. Around the curves, it takes a little bit of guess-and-check to see where the adhesives are best placed.

Step 4: To kick the craftiness up a notch, add matching ric-rac around the edges of the body and cut out a heart from matching scrapbook paper to add to the front.


Here's another adorable tutorial for decorating mailboxes that I found on Pinterest. I love the candlestick stands. They're making me wish I had splurged on more than one mailbox!

Valentine's Mailboxes from the anderson crew

And, if you're wondering what goodies you should hide inside these cute mailboxes, stay tuned! Later this week, I'll be sharing some ideas!

Monday, February 06, 2012

Valentine's Fabric Tags Tutorial

"If I had a flower for every time I thought of you, I could walk in my garden forever."
-Alfred Lord Tennyson


Today is Day #1 of Valentine's Week here at Dancing Commas. Here is the first project of a whole series I have planned for the week. Three different fabric tags to express your love. Use them to top your sweetheart's gift or just send along to your best friend. Make one, or make them all!


Materials needed: khaki linen fabric, patterned fabric, white fabric, lightweight interfacing, thread, matching buttons, Steam-a-Seam, pinking shears, bone folder, letter stamps, stamp pad

    Step 1: For each tag, cut two of each shape from the khaki fabric. Also, cut a piece of interfacing just smaller than each shape and attach (according to the manufacturer's instructions) to the back of one of the khaki pieces.

    Step 2: Stamp a love message on a small scrap of white fabric.


    Step 3: Use Seam-a-Seam to adhere the patterned scrap and the stamped scrap to the center of each khaki tag (the piece without the interfacing).


    Step 4: Embellish the tag with zigzag stitches and mini buttons.


    Step 5: Cut a 8" by 2" piece of patterned fabric. Press in half. Then, press each end toward the center crease to create a 1/2" fabric ribbon. Top stitch both edges of the ribbon.


    Step 6: Pin the khaki pieces with right sides together (the fabric ribbon should be looped towards the middle and sandwiched in between). Stitch three sides with a 1/2" seam allowance, leaving an opening to turn right-side out.


    Step 7: Turn right-side out, using a bone folder to push all of the seams out. Pin flat, and top-stitch around edge.


    Don't mind our brass doorknobs in the photo below. There's not a single doorknob in our whole apartment that doesn't have paint splattered on it!


    To download the tag patterns, right-click each image below, and click "Save Image As."

    You might also enjoy...

    Related Posts Plugin for WordPress, Blogger...