"Love is when you can be your true self with someone, and you only want to be your true self because of them."
-Terri Guillemets
Want to see what my husband's getting for Valentine's Day?? You have to promise to keep it quiet for a couple of more hours until he gets home from work.... pinky swear??
My tradition is to make my Valentine's Day gifts for Rob. And, sometimes that's tricky, given that we're not a super-duper, lovey-dovey, smooshy-mushy couple. Here are a couple of ideas that I've used previously: 2011, 2010, 2009, 2008.
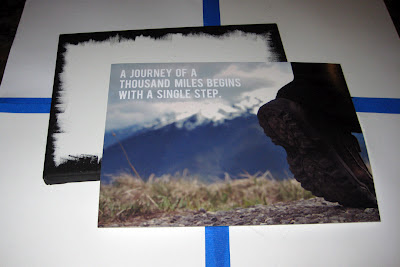
This year, I spiced up a favorite photo (from our 2010 Washington trip) with a favorite sentiment and then took advantage of a project I had been wanting to try: canvas photo art. There are lots of tutorials out there, but I thought I would show you what worked for me. Despite my initial apprehension, it turned out great. Just need a house with walls to hang it on!
Supplies needed: photo printed to size (I used a 12x12 matte photo from Persnickety Prints), canvas, acrylic paint, Mod Podge, foam brushes.
Step One: Paint the edges of the canvas with dark acrylic paint. Make sure to blend the color over to the front and back edges of the canvas.
Step Two: Trim your photo to size... be careful because canvases are not always exactly the dimensions they say the are. I trimmed enough so that the image was just the slightest bit (I mean, less than a millimeter!) smaller than the canvas. Just enough so that it didn't overlap!
Step Three: Paint an even layer of ModPodge on the back of photo. You want to completely cover then page. Turn over and adhere to the canvas. Lightly rub a clean cloth (or your sleeve!) over the surface to remove any air bubbles.
Step Four: Even after my coat of ModPodge, I found that the edges didn't stick very well, so I peeled up the edges to reinforce the corners. Let sit for 5 minutes.
Step Five: Carefully paint a thin, even layer of ModPodge over the top of the photo. Make sure to go in the same direction and to avoid globs of glue or little crumbs of dried glue. This is the part that had me scared... it goes on milky white, but I promise it dries almost clear.
Step Six: I wasn't totally happy with my coverage the first time around, so a couple of days later, I added another coat of ModPodge on top. After this dried, all of my "problem areas" were fixed, so I'm really glad I took that chance with the second coat.
And, a Valentine's Day gift from me to you... the boot photo for your own use. Maybe you use it as your desktop background, print it for a frame, or maybe even make a canvas of your own.
To download the photo, right-click the image below, and click "Save Image As."


I LOVE it and I'm sure Rob did, too! I love that photo, too!
ReplyDeleteLove that gift and the photo!
ReplyDeleteCool. I like what you did with the edge of the frame. Nice job.
ReplyDeleteCanvas Prints